Golden Helix has just released VarSeq v2.2.3. In this update, there are notable changes that can improve CNV calling capabilities covered in this webcast. The topics discussed included:
- Accounting for GC content
- Improvements to CNV quality flags
- Using target filtering
- Updates to the CNV sensitivity and precision settings
This blog post will elaborate on these capabilities and demonstrate how they can be implemented into your clinical workflow.
GC content
When we introduce the CNV caller, we highlight that you can call CNVs from the existing coverage data stored in your BAM file and that the way we do this is through data normalization. Normalization is an important step as it accounts for systematic biases that can influence the coverage profiles between samples and between targets within a sample. As you might have guessed, GC content is one factor that contributes to coverage bias.
GC content can influence read coverage found in most sequencing platforms. Reasonings for this have been the focus of many publications, but the idea is that the GC content of a genomic region can lead to discrepancies in the number of reads sequenced by the platform. Since the CNV algorithm is dependent on the depth of coverage, it is understandable that GC-content could influence CNV detection as the CNV algorithm uses reference samples to compare to the sample of interest. This can be shown using Figure 1: the mean reference sample standard deviation increases with an increased GC content of the genomic region. Thus, a high GC content over observed targets results in a high control variation and an inability to accurately call CNVs.

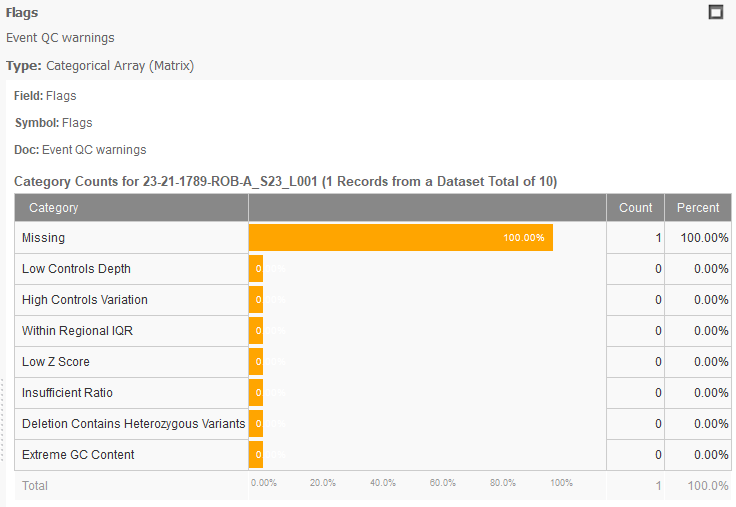
To improve the CNV caller, VarSeq v2.2.3 now provides new flags for Extreme GC Content, shown in Figure 2. This flag will be present for any event with a GC content below 30% or above 70%. The idea is to provide more information to determine if the event is a true positive. Knowing that GC content could influence CNV calling, the next step would be to eliminate those regions of high GC content in your reference set. To do this, we now support target filtering.
Target Filtering
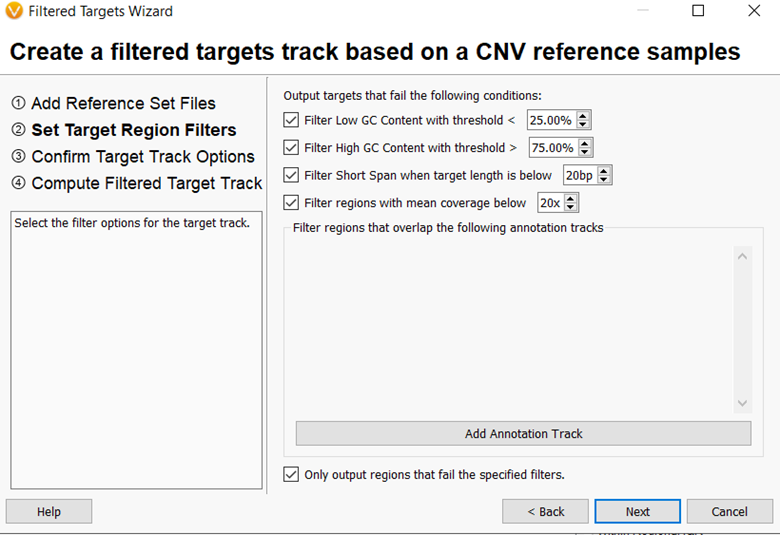
In VarSeq v2.2.3, there is a new Create Low-Quality Targets wizard accessible from the Manage Reference Samples dialog. This feature produces a set of targets from a selected panel that fail various quality metrics. These metrics, shown in Figure 3, include average depth across all reference samples, extreme GC content, and too short spans. This is accomplished by using aggregate statistics from precomputed CNV reference samples to create an annotation track with poor quality regions. This track can then be used to remove these regions from the analysis when running the CNV algorithm, improving the accuracy and sensitivity of CNV calling.
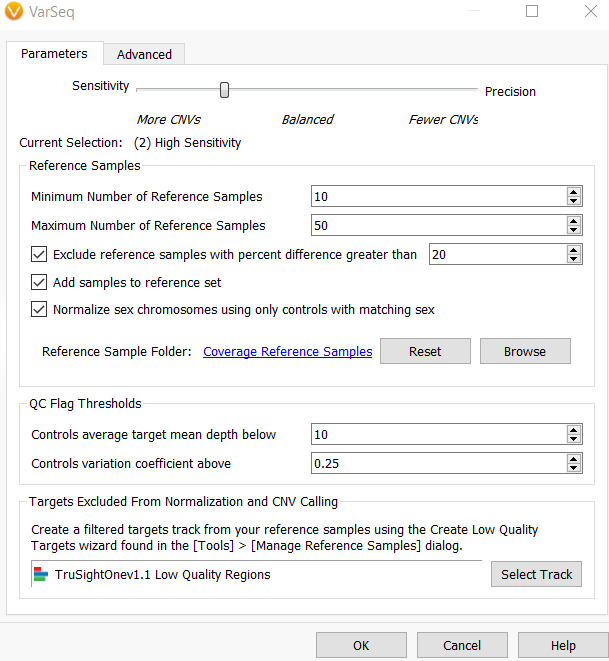
When computing CNVs, there is an option to exclude targets from normalization and CNV calling, shown in Figure 4. Once you apply your low-quality annotation track, it will identify the regions to discard from the process. This, in turn, eliminates problematic targets with large fluctuations from sample to sample and improves the normalization process.
Sensitivity and Precision Settings
Another main improvement to the CNV calling algorithm includes updates to the sensitivity and precision setting dialog. This new interface now contains extended options between the sensitivity and precision settings to improve the fine-tuning of your CNV parameters. In VarSeq v2.2.2, the previous Balanced setting is now the High Sensitivity setting in VarSeq 2.2.3, Figure 4. If you would like to try to use the different settings in the same project, you can rerun the CNV caller by right-clicking on the CNV Info and selecting Edit, Figure 5. This will bring you to the interface to change the implemented parameters.

In conclusion, many updates became available in VarSeq v2.2.3. The ones discussed here focused on the new capabilities of the CNV caller. Thank you for reading our blog, VS-CNV Updates in VarSeq v2.2.3. If you would like to see this feature in action, we recommend watching the webcast or reaching out to support@goldenhelix.com. If you enjoyed this content, please check out some of our other blog posts, which contain important information and updates on our clinical interpretation capabilities. Thank you for reading this blog post, and we look forward to hearing from you.