The VarSeq CNV calling algorithm, VS-CNV, is a powerful tool for calling CNVs from the NGS coverage data stored in your BAM files. However, before this algorithm can be deployed in a clinical setting, it must be tuned and validated using data that is representative of your lab’s NGS workflow. In the past, this validation process could be difficult, as VS-CNV allows the user to choose between several different precision levels. Thus, the algorithm would need to be run repeatedly during validation to determine which level of precision provides the best performance. In this blog post, we will be exploring a new feature of VS-CNV that can be used to streamline the validation process by calling CNVs at all levels of precision. We will show how to enable this new feature and demonstrate how it can be used to select the appropriate level of precision for your data.
In our example, we will be validating VS-CNV workflow for a whole-exome sequencing (WES). In order to perform this validation, we will be using a project containing multiple WES samples with confirmed micro-array calls. We have already computed coverage for these samples and are ready to begin calling CNVs. To run the CNV caller, we select Add → Secondary Tables → Add CNVs.

Normally, we would select a specific level of sensitivity/precision using the slider at the top of this window. However, since our goal is to determine which level of precision best suits our workflow, we will instead run the algorithm at all levels of precision. To do this, we will switch to the Advanced tab and select the checkbox labeled Run at all levels of precision.
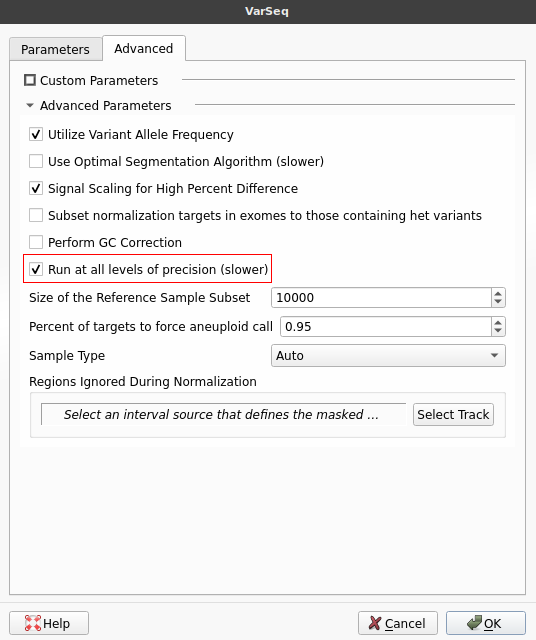
While running the algorithm in this mode will increase the required run time, it is vital for determining which precision level is best suited for our workflow. After selecting this option, we will go ahead and click OK to run the algorithm. Once the algorithm finishes running, the CNV table will be displayed. Notice that a field labeled Precision Levels has been added at the end of the table. This field lists all of the precision levels at which each event was called. We can add a filter to this field by right-clicking the field header and selecting Add to Filter Chain.
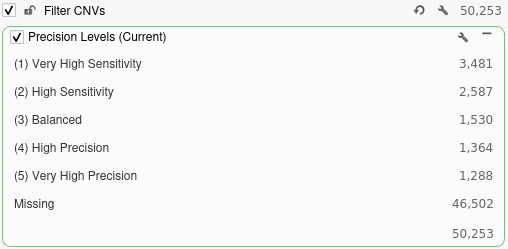
Looking at this filter, we can see the total number of CNVs called at each level of precision. Running the CNV caller on the most sensitive setting would produce over 3,000 unfiltered CNV calls while running the algorithm on the most precise setting would produce just over 1,000 calls.
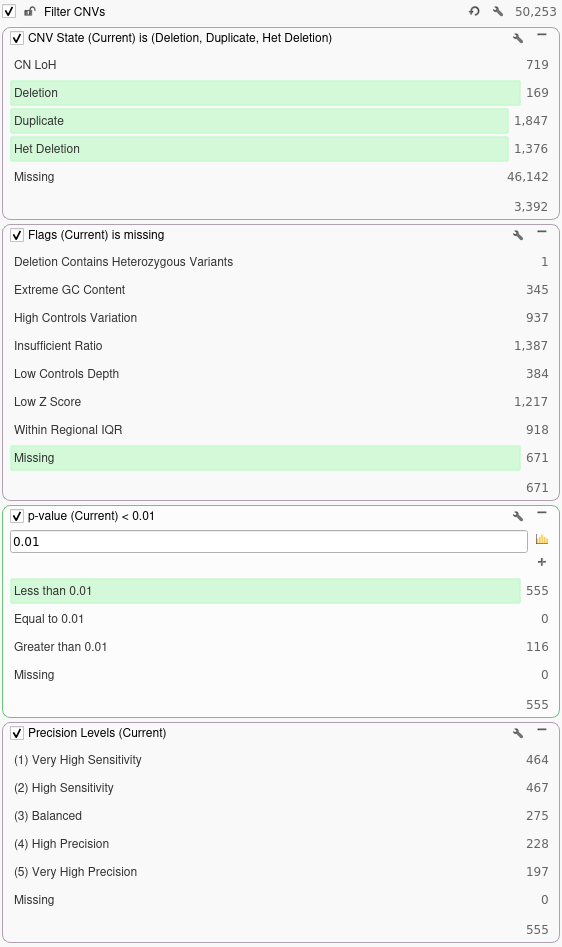
Next, we will filter out any CNVs that are not present in the current sample by right-clicking the CNV State field and selecting Add to Filter Chain. For this filter, we will select Duplications, Deletions, and Het Deletions present in the current sample. After this, we will remove any flagged CNVs by adding a filter on the Flags column and selecting Missing in the filter chain. Next, we will add a filter on the p-value field to filter out any CNVs with a p-value exceeding 0.01. Finally, we will move our Precision Levels filter to the bottom of the filter chain to obtain the following set of filters:
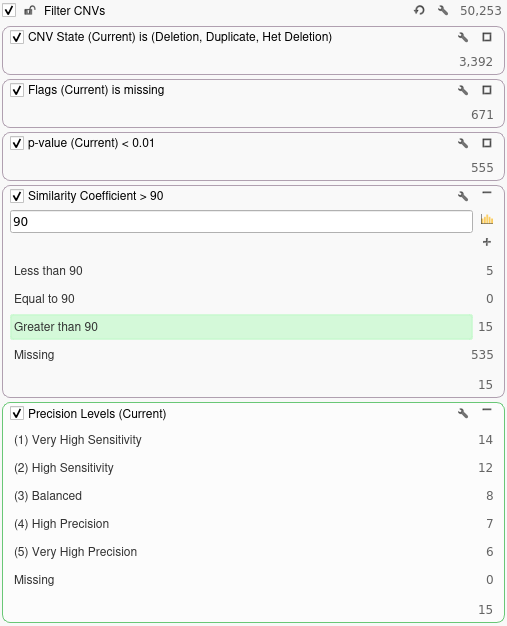
Now that we have done some basic quality filtering, we can annotate against our truth set for the current sample and see how adjusting the precision setting would affect our ability to detect the confirmed array calls for this sample. The truth set we will be annotating against contains 14 confirmed array calls for the current sample. To annotate against our truth set, we will click Add → Secondary Tables → CNV Annotation. In the dialog, we will search for the truth set annotation and click the Select button. Once we have annotated against our truth set, we can filter down to CNVs that overlap the confirmed array calls by adding a filter on the Similarity Coefficient column. For this example, we will be filtering down to CNVs that are 90% similar to a confirmed array call. In the filter chain below we can see how many of the confirmed array calls in our truth set are correctly called by VS-CNV at different levels of precision.
Using the two filter chains shown above, we can construct the following table showing how our sensitivity and number of calls change as we adjust our level of precision:
| Precision Level | Unfiltered Calls | Filtered Calls | Sensitivity |
| Very High Sensitivity | 3,481 | 467 | 100% (14/14) |
| High Sensitivity | 2,587 | 464 | 86% (12/14) |
| Balanced | 1,530 | 275 | 57% (8/14) |
| High Precision | 1,364 | 228 | 50% (7/14) |
| Very High Precision | 1,288 | 197 | 43% (6/14) |
Based on the above data, we can see that the Very High Sensitivity setting results in 100% sensitivity for this sample, while only producing 3 additional calls relative to the High Sensitivity Setting. The Balanced setting reduces the number of filtered calls by nearly 50% relative to the Very High Sensitivity setting but results in a lower sensitivity of 57%. Based on this data, a lab that prioritizes sensitivity may prefer the Very High Sensitivity setting, while a lab that prioritizes precision would prefer the Balanced setting.
It should be noted, that the above example only describes the validation process for a single sample. In practice, validation should be performed across multiple samples using a confirmed truth set of CNVs called using alternative methods. The new feature described above greatly streamlines this process, by giving users the ability to run VS-CNV across all precision levels, so that each lab can determine the level of precision that is right for their CNV workflow.
Thank you for reading this blog post. If you have any questions or comments about CNV workflow and other information presented here or about our software, feel free to enter them into the comments below or email us at support@goldenhelix.com. If you enjoyed this content, please check out some of our other blog posts, which contain important information and updates on our clinical interpretation capabilities. For information regarding VS-CNV and the other capabilities of the VarSeq suite and CNV workflow, please email us at info@goldenhelix.com.