Thanks for checking out this blog on how to to get more out of your VarSeq projects! The best way to show off one of my favorite new features that have been incorporated into the latest VarSeq 2.2.3 release is with a scenario:
You work in a lab that processes and analyzes multiple whole exome samples for copy number variations, and you have been tasked with setting up and running the built-in VarSeq CNV caller for 50 samples. Everything is going great as you have added all the BAM files necessary to create your reference set. You have computed coverage for the 50 samples over all exonic regions defined by your bed file. Now you are ready to run the CNV caller algorithm. The CNV caller algorithm has many options that allow you to customize calling CNVs, such as excluding low-quality target regions from CNV calling, including GC content correction, and selecting 1 of 5 sensitivity and precision settings.
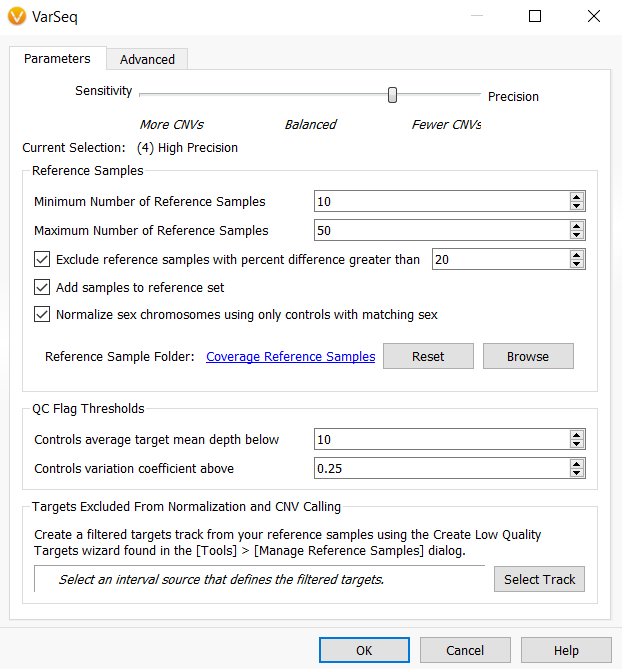
You have chosen to select the balanced setting for sensitivity and precision, included GC content correction, and defined a few custom thresholds for Z-score and ratio, but left all other settings as default and run the CNV caller. Once the computation is complete, you are reviewing the output and notice that the average number of CNVs called within your samples is around 300 CNVs and that some of these CNVs are being called in the HLA region, which you know is historically a difficult region in which to confidently call CNVs. You decide that you want to run the CNV caller again with all other settings kept the same, but to also include an interval track that excludes the HLA region from CNV calling and change the sensitivity and precision settings to be more precise to not only limit the number of CNVs called per sample but capture higher quality CNVs overall.
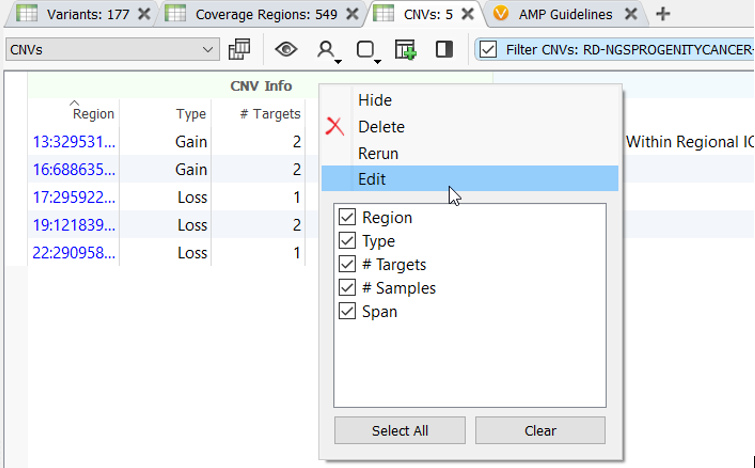
You are getting ready to delete the CNV caller algorithm and start from scratch. Then you remember, from this blog, VarSeq algorithms can now be edited by right-clicking on the algorithm output in the variant/CNV table!
After selecting the Edit option, the CNV algorithm settings dialog opens, and the previous settings used to run the CNV caller are preserved. This means the custom z-score and ratio settings are preserved, and GC content correction is still selected. Now, all that needs to be modified is to slide the precision bar to High Precision and select the HLA bed file for the Targets Excluded From Normalization and CNV Calling.
Ultimately, instead of destroying the work that had already been done and starting over, the option to edit VarSeq algorithms saves the user time and simplifies project layouts. The option to edit VarSeq algorithms is not limited to the CNV caller. Almost any algorithm included within VarSeq that has user-defined parameters can now be edited with a simple right-click!
I hope you enjoyed reading about this new feature! As always, if you have any questions, please reach out to our field application scientist team at support@goldenhelix.com. If you enjoyed this content, please check out some of our other blog posts, which contain important information and updates on our clinical interpretation capabilities. Thank you for reading this blog post, and we look forward to hearing from you.