A common feature request from Golden Helix customers is to curate and make available genome assemblies for different plant and animal species. These requests commonly come from SVS users as many research projects are being carried out, and having the genome assembly available for analysis is essential. That being said, Golden Helix has an SVS Tutorial available that walks users through creating a genome assembly in SVS. However, this tutorial is very detailed, so I hope to simplify these curation steps and provide some helpful tips along the way! Thus, by popular demand, I wanted to write a brief how-to on curating genome assemblies which can be done completely within SVS!
The species I will be using in the example is the cattle (Bos taurus) genome. There are essentially two steps in curating a genome assembly for use in SVS: 1) Create a reference sequence and 2) Create a gene track. Let’s get started!
Step 1: Create a reference sequence from a FASTA file. Let’s break this down.
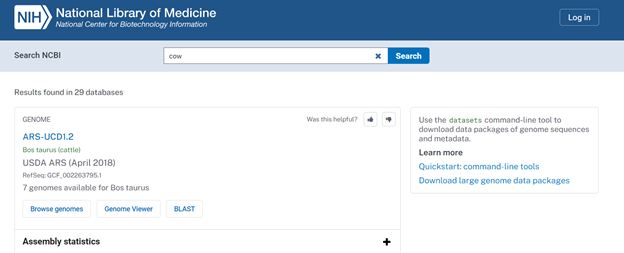
- Download the FASTA file (either .fa, .fsa, or .fasta file extensions) for Bos taurus. The best resource to find these files is from the NCBI website. You can search the species by common name or Latin name. The results of the search should look similar to those shown in Figure 1. Then, click on the desired assembly. In this case, I will click on the ARS-UCD1.2 link.
- After clicking on the assembly link, you should be redirected to a webpage that looks like the screen shown in Figure 2. The information outlined in red will be used for creating the assembly and reference file, and the information outlined in green will contain the data downloads that we will need.
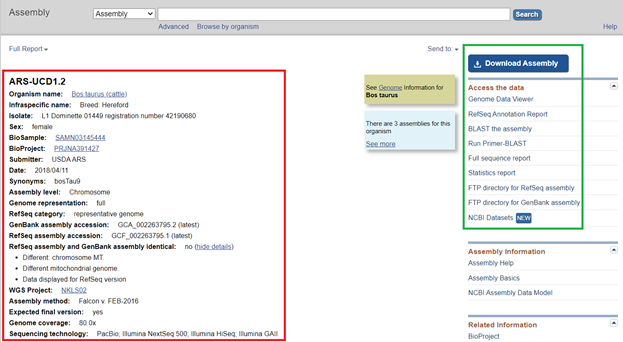
- To download the FASTA (.fna) file, click on the blue Download Assembly icon.
A quick NOTE: If NCBI does not have your species available, you might also try USCS and JGI/Phytozome though these sources are primarily useful for plant genomes. Also, if a chromosome level assembly is not available for your desired species, you can choose scaffold. However, during the conversion process, the cut-off point will include only the 5000 largest scaffolds.
- Once the file is downloaded, open the Data Source window in SVS (Tools ->Manage Data Sources) and open the Convert Wizard in the bottom left-hand corner. In the convert wizard window, add the downloaded .fna file.
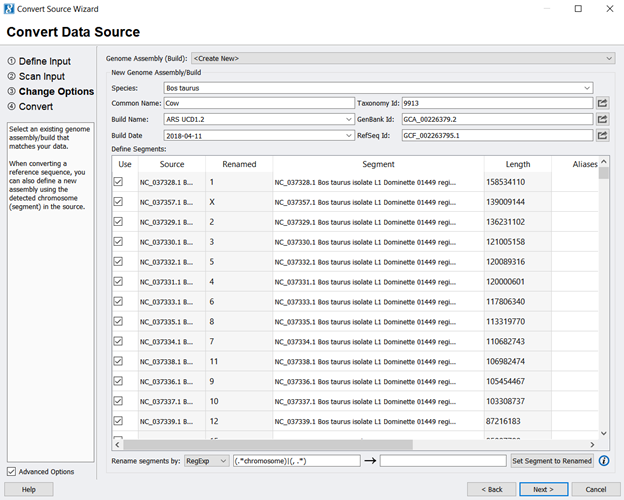
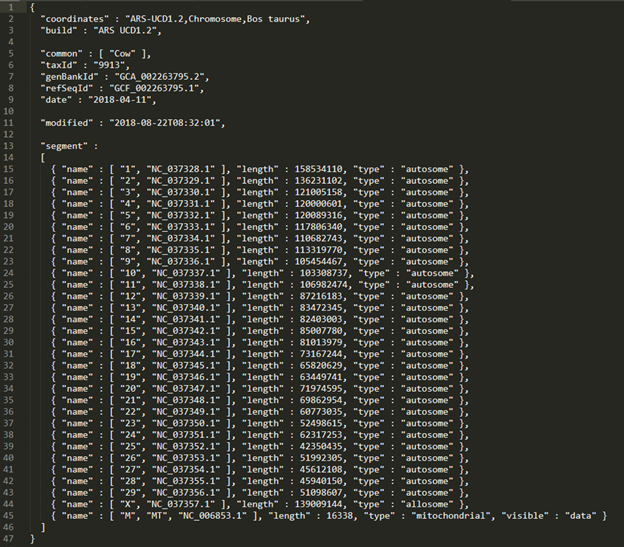
- Next, you will use the NCBI information to fill in information about the genome assembly, such as the species name and Genbank ID (Figure 2). To extract the chromosomal information only, uncheck all entries and only check the chromosome values (any entry starting with NC_). At this point, you can also use any Regular Expression (RegExp) skills to clean up the segment/ chromosome names. Be sure to click Set Segment to Renamed to finalize the changes. Figure 3 shows what the assembly should look like before you click next.
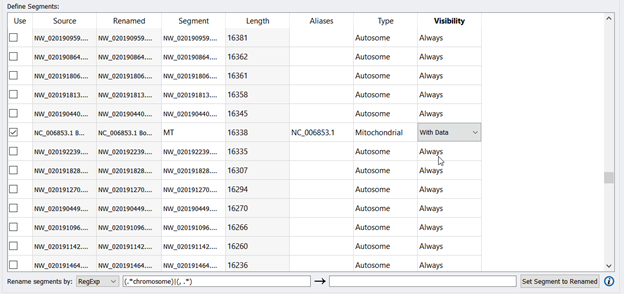
Another important NOTE: When renaming segments/chromosomes using RegExp, some exceptions are the mitochondrial chromosomes for animals and chloroplasts for plants. The MT entry will need to be renamed manually. You can find the MT entry by scrolling down and looking for another NC_ entry among the NW_ entries. Then enter in MT for the Segment, type in NC_006853.1 in the Aliases column, Type= Mitochondria, and choose With Data from the Visibility dropdown. Figure 4 shows what the edited fields should look like.
- Once the conversion is complete, an assembly file and reference sequence are created. The reference sequence will be automatically added to your SVS annotations folder. The assembly file will be added to the Genome Assemblies Folder, which can be accessed from within SVS by going to Tools -> Open Folder-> Genome Assemblies Folder. After navigating to the Genome Assemblies Folder, click on the assembly file created and open it in a text editor.
- The assembly file often needs to be edited to correctly work in SVS projects. These edits include adding the build line to the file and re-ordering the chromosomes.
Quick TIP! When making these edits, it is important to pay attention to formatting, like spacing and comma placement.
- The final edited .assembly file should look like Figure 5. Don’t forget to save the edits that you have made before moving on.
So far, so good! The hard part is over, and the next step, creating the gene track, is much easier. The gene track accompanies the reference sequence and will incorporate gene names to the genomic coordinates from the reference sequence/assembly file.
Step 2: Building a gene track
- To start, download the GFF or GTF files (.gff,.gff3, or .gtf) by clicking on the FTP directory from the NCBI website (Figure 2).
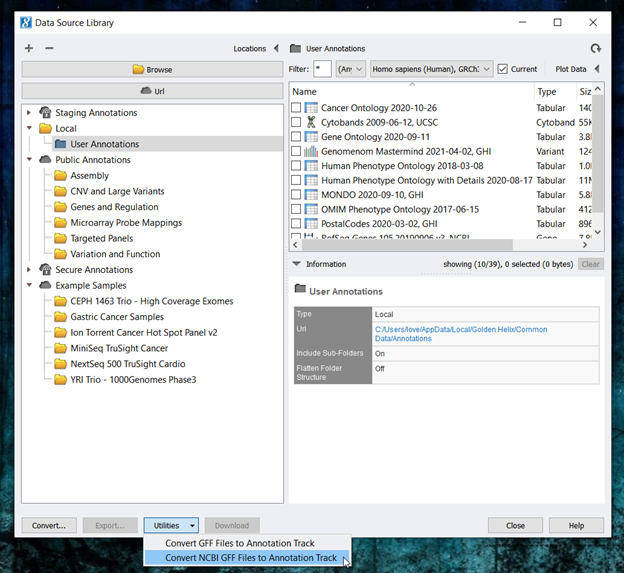
- Next, open SVS and go to Tools-> Manage Data Sources. Then, click on Utilities and select Convert NCBI GFF to Annotation Track ( Figure 6).
- You can feel free to edit any of the information at the top of the NCBI RefSeq GFF Conversion interface. However, because we are using GFF files downloaded from NCBI, we will leave all of the default settings for the cattle gene track. Next, from the species drop-down menu, select the Bos taurus genome assembly curated in Step 1. Then, click Add Files and navigate to the downloaded GFF file from NCBI. Click convert once your screen matches Figure 7.

Once the conversion finishes, the gene track will automatically be added to the annotations folder for use in SVS! That was a lot of information, and this is certainly a more advanced application with SVS. That being said, if you have any questions, please reach out to support@goldenhelix.com, and our field application scientist team will be happy to assist!