With the release of VSReports, we added the ability to “select” rows of your filtered output (often variants, but potentially things like coverage regions or genes) with a new feature dubbed “Record Sets”, but more often described as “colored checkboxes” for your tables.
Although necessary for the important task of marking primary, secondary or other sets of variants for a given report, we quickly realized how powerful a persistent marking of variants could be in various workflows.
For example, we have already seen custom variant sets used for:
- Marking false positive variants to be excluded
- Selecting candidate variants to be confirmed by Sanger Sequencing
- Defining a manually curated filtered text output for integration with an existing database
- Adding coverage regions that fail minimal read depth metrics to reports as regions not assessed by the test
For the upcoming 1.3.1 VarSeq release, we have expanded the utility of this feature even further and enabled its usage from VSPipeline.
Interpret, Decide and Check Mark: Variant Set Basics
Record sets, or more specifically variant sets when commonly applied to variant tables, are the answer to a very common question: How do you capture a simple classification decision made in VarSeq’s rich interpretation interface?
Now, for each of the classifications you would like to make, you simply create a custom-named column in your table that will be filled with colored checkboxes. Each row’s checkbox can be toggled with a single click, or set in bulk to some filtered table’s result. Your checks are saved as part of the project and will be there the next time it is opened. They are even part of your saved project templates, so they can be made an integral part of your repeatable VarSeq workflow.
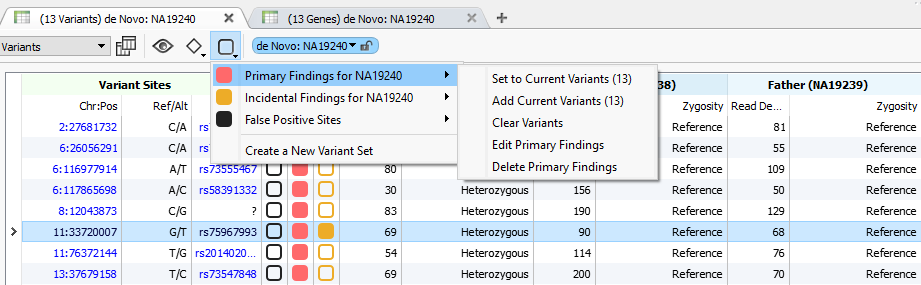
The new checkbox-like menu allows you to bulk “check” the items in your table for existing variant sets or create a new custom variant set.
By default, the checked state is specific to the current sample. So your selection of say your “Primary Findings” that you might use to drive your report is specific to your current affected sample, but as you change your current sample you would see the check state change for a given variant. In some situations, you may want to flag variants regardless of samples (maybe potential false-positive sites for example), and you can do that by unchecking “Sample Specific” when creating a new variant set.
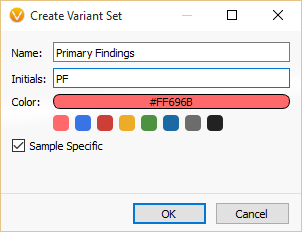
You can provide a custom name, initials (used as the table column header) and color of your check boxes. Sample-specific makes the checked state paired with the currently selected sample in VarSeq.
Tracing a Variant through the Filter Chains
With the VarSeq 1.3.1 release, we added a new, very powerful way of visualizing the set of variants you checked. Now in the filter tab, each variant set will have a number in a colored box next to the filtered output of each filter card. Of the total number of variants outputted from that filter card, the number of variants you checked for your variant set is displayed.
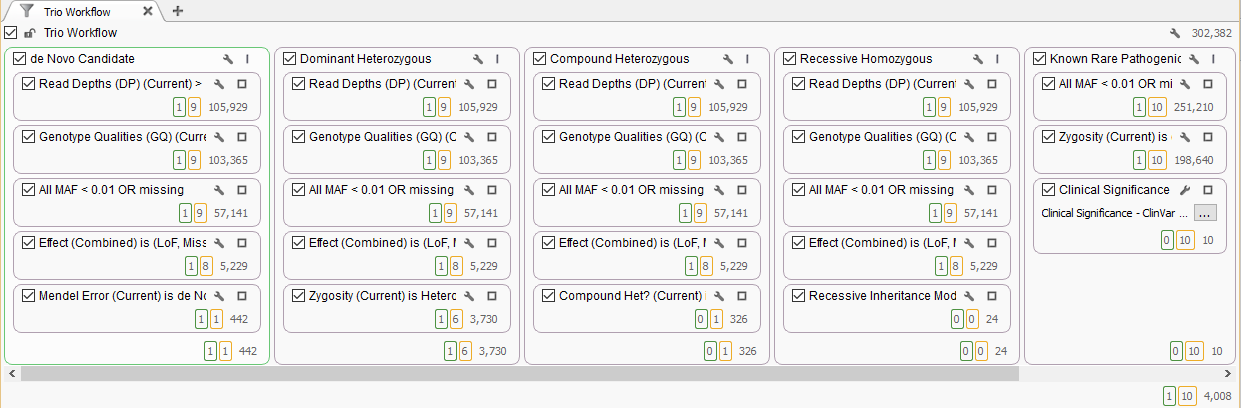
An example trio filtering workflow, where the 10 ClinVar pathogenic variants in the “Known Rare Pathogenic” filter column are set in the yellow record set. This illuminates that 1 of those variants is a de Novo candidate, 6 Dominant and 1 in a Compound Het gene. The de Novo variant was marked as the best candidate in the green variant set.
This becomes useful in a number of scenarios, and you may intuitively start using it for even more.
- Diagnosing where a specific variant gets filtered out of a given filter chain.
- Marking a variant in a grouped by genes table, and finding it in the variants table
- Clicking on the number to see a subset of your marked variants at an intermediate filter result
- Seeing how many variants are shared between two OR’d groups of filters
Once you start to get used to navigating the intermediate filter results, adding variants to variant sets, jumping to where they are filtered out or other places they show up, you can quickly integrate this as a key tool in the candidate variant analysis and interpretation process.
Finally, you can right click on a variant set’s table column, like any other column in VarSeq and create a filter card based on it, allowing you to manually control the final set of variants in your filtered project results. You may discard variants that fail manual review, select the best candidates to take forward or split the interpretation work between multiple variant scientists by giving them each a set of variants by color.
Workflow Enabler
Also with this release, we added commands to VSPipeline to make the same bulk variant set operations to tables that are available from the checkbox menu. This means you can do things like have your project apply your annotations and filters, and then add all the final filtered variants to your Primary Findings list by default. If your project was set up with a report template, this means on the project open, a draft report is ready to review for someone doing the interpretation work.
I am looking forward to seeing other ways in which this flexible capability is leveraged for people to enhance and specialize their own variant workflows. If you come up with one that works for you, drop us a line at info@goldenhelix.com or share by commenting on this post!