VSPipeline is becoming a very popular tool among VarSeq users as it is essential for creating repeatable clinical workflows that can be executed in automated fashion. Since VSPipeline is a command-line tool, I think it would be helpful to discuss some of the best practices along with helpful tips for getting the most out of VSPipeline.
Some of you may be less familiar with VSPipeline, so I want to cover how to set up the first run along with sharing the helpful tips as they arise.
The first step is to create a project template that contains the desired variant annotation sources and algorithms (ACMG Classifier, predefined genes lists, phenotypic prioritization, etc.), user defined filter logic, and the desired project layout.
Helpful Tip Number 1: Before saving the project as a template, it is important to consider how you want the data exported. A great way to maintain consistency and streamline exporting data is to lock the tables (variant, CNV, coverage regions, etc.) to the correct filtered results. You can do this by clicking the lock icon for each table that you want exported. (Figure 1)

In addition, it is also recommended to give each table a unique name so they can be easily referenced with VSPipeline commands. To re-name the tables, right-click on the tab of the table and select ID: Table1. (Figure 2)

Once the project template is saved, it will be the basis for automating project creation with VSPipeline.
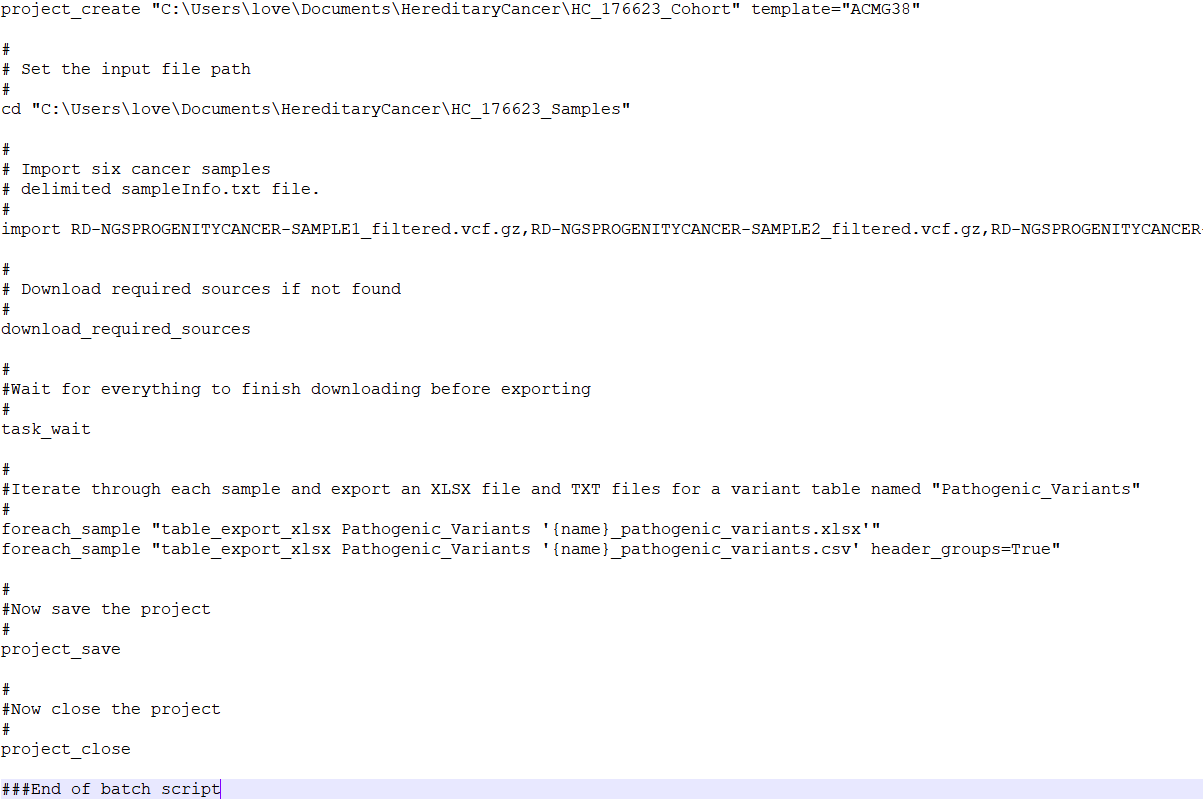
The next step in preparing to run VSPipeline is to set up a batch script which will contain a series of commands to perform tasks such as import samples into the project template, download the necessary sources, and export the final results. Figure 3 is an example VSPipeline script that I will use as a guide to describe the best practices workflow with VSPipeline.
Before moving on, I want to mention that the VarSeq license structure along with the environment in which VSPipeline is running can influence which commands need to be included in the VSbatch script.
If the user or computer that will be running the VSBatch script is different from the user that was used to create the template, it is important to make sure that all the external resources used by the project will be available when VSPipeline is run. This includes data such as custom annotations, assessment catalogs, as well as the reference samples used by the CNV caller. If your annotations are stored on a shared network drive, you will want to make sure that the shared location is set up as the Annotations directory in the VSPipeline environment. Alternatively, if you are not using a shared directory, you can copy all of the custom annotations to the Annotations directory of the VSPipeline user. The same process applies for the assessment catalogs as well as the CNV reference samples. If this is your first time setting up VSPipeline, it is a good idea to run the project template once in VarSeq as the same user and in the same environment that VSPipeline will run. This makes it easy to find and update any missing sources or adjust the template.
Helpful Hint Number 2: If you are part of a multi-user lab, placing a login command at the beginning of the VSbatch script will prompt the current user to log in before the new project is created. This is important as the logged in user will be recorded in the project log. Potentially, it may be beneficial to set up a special user for running VSPipeline.
Referencing the example batch script in Figure 3, the first step is to create a project using the project_create command. The location of where the project will be created is defined and the project will be named HC_176623_Cohort, and will use the VarSeq project template named ACMG38. Then the cd command navigates to the file directory containing the samples that will be imported into the project. The import command followed by the names of the sample vcf files will add the samples to the project. The next command, download_required_sources, will download any annotation sources that are not already downloaded into the local annotations folder.
Helpful Hint Number 3: There is also a download_annotations command, which is useful when VSPipeline is first installed as it will download the appropriate reference sequence (GRCh 37 vs 38) and gene track among a few other necessary sources. However, the download_required_sources command is appropriate for batch scripts to ensure that the correct sources are downloaded locally.
Returning to the sample batch script (Figure 3), the next command is task_wait. The task_wait command may seem unnecessary, but VSPipeline uses this command to ensure that the annotations are downloaded before attempting to move on to the next command. The import command is asynchronous, this means that after starting the command, VSPipeline will continue to the next command in the batch file. In this case the download_required_sources runs after the import has started, this allows it to download the reference sequence if it is required by the import command. Adding the task_wait tells VSPipeline to stop processing commands until all of the previously started commands have finished running. Without the task_wait VSPipeline would continue through to the end of the VSbatch script and close the project before the variants have finished importing resulting in an empty project.
Helpful Hint Number 4: Other commands that are supported by the task_wait command are project_update_sources, update_cnv_import, and sometimes the import command as these are asynchronous tasks and otherwise VSPipeline will not wait for the tasks to complete.
The last set of commands in the sample batch script are responsible for exporting the data from the project, and saving and closing the project. The foreach_sample command is very powerful in the event that there are multiple samples in one project. In the example script, for each sample in the project, an xlsx and csv will be generated containing the filtered results of the Pathogenic_Variants table.
Helpful Hint Number 5: You can use the “affected_only” parameter to only output the affected samples in your project: foreach_sample affected_only=True “table_export_text Pathogenic_Variants pathogenic_variants_{name}.tsv”.
Helpful Hint Number 5 ½ : It is always a good idea to add the command “get_task_list” to the end of your VSbatch scripts. This will output the status of all of the algorithms in the project and can be helpful when trying to determine why algorithms haven’t run, if they have errors. It will also tell you when there are new annotation sources available.
VSbatch scripts automate the steps from project creation to exporting final filtered results. This means that you do not need to manually carryout each of the steps by clicking through the VarSeq user interface. The VSbatch script does all of this work automatically; you can even run VSPipeline over night! VSPipeline has many commands available to ensure consistency among your datasets and ultimately give you more control over the results. I have touched on a few commands in this blog but a complete list of available VSPipeline commands can be accessed from the VSPipeline command shell by typing help.
Helpful Hint Number 6: If you would like help or more information on any of the commands within the list, you can type help and then the name of the command like so: help project_create.
I hope this blog has simplified the process of setting up and using VSPipeline. That being said, I encourage you to reach out to support@goldenhelix.com as the Golden Helix support team is always available to help set up VSPipeline batch scripts or answer any questions that you might have!