Clinical labs need to be able to process samples down to a short list of variants and publish a professional report. VSReports helps scientists and clinicians alike create timely, actionable reports that can improve clinical decision making and streamline patient care by seamlessly incorporating the results of tertiary analysis into a customizable clinical report.
To include the VSReports functionality in your workflow, you will first create a Record Set. To create a Record Set in VarSeq, simply click on the Record Set icon in the table view toolbar. Creating a Record Set in VarSeq allows users to flag and choose which variants to include in a clinical report. For this example, I have created two Record Sets labeled, “Primary Findings” and “Incidental Findings” (Figures 1 and 2).
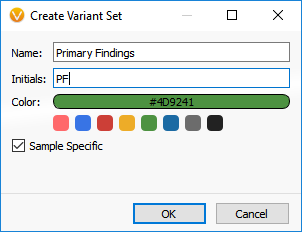
Figure 1. Creating a Variant Set.
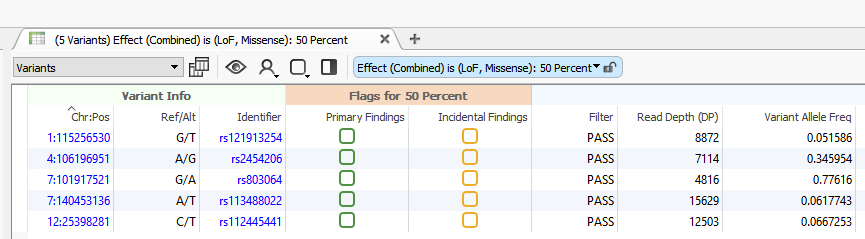
Figure 2. Variant Set in VarSeq.
Next, from an open VarSeq project, go to View > Open > Report.
The foundation for a report is a template. Templates are located in your User Data location in a folder called ReportTemplates. Initially, this folder is empty. However, VarSeq ships with the following three report templates that are modeled off of the ACMG guidelines:
- Exome Trio analysis
- Hereditary gene panel analysis
- Cancer panel analysis
These report templates are a way to get you started and are included free of charge.
To add an example template to the folder, click on the Create New Report Template icon in the toolbar of the reporting view. You will be prompted to select a starting template and to enter a name for your template (Figure 3). After clicking OK, a template with the entered name will be located in the ReportTemplates folder. It will be accessible in any VarSeq project.
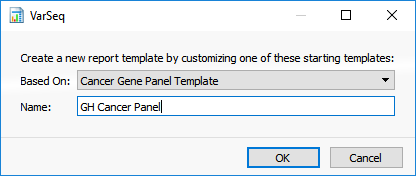
Figure 3. Creating a New Report Template.
Now that you have created a report template, you can configure your report by clicking on the Gear Menu on the right side of toolbar. This dialog contains all the settings which are not expected to change between uses of the template. It contains values such as lab name, log, test description and gene set (Figure 4). These fields should be filled out to match the test being run in the lab.
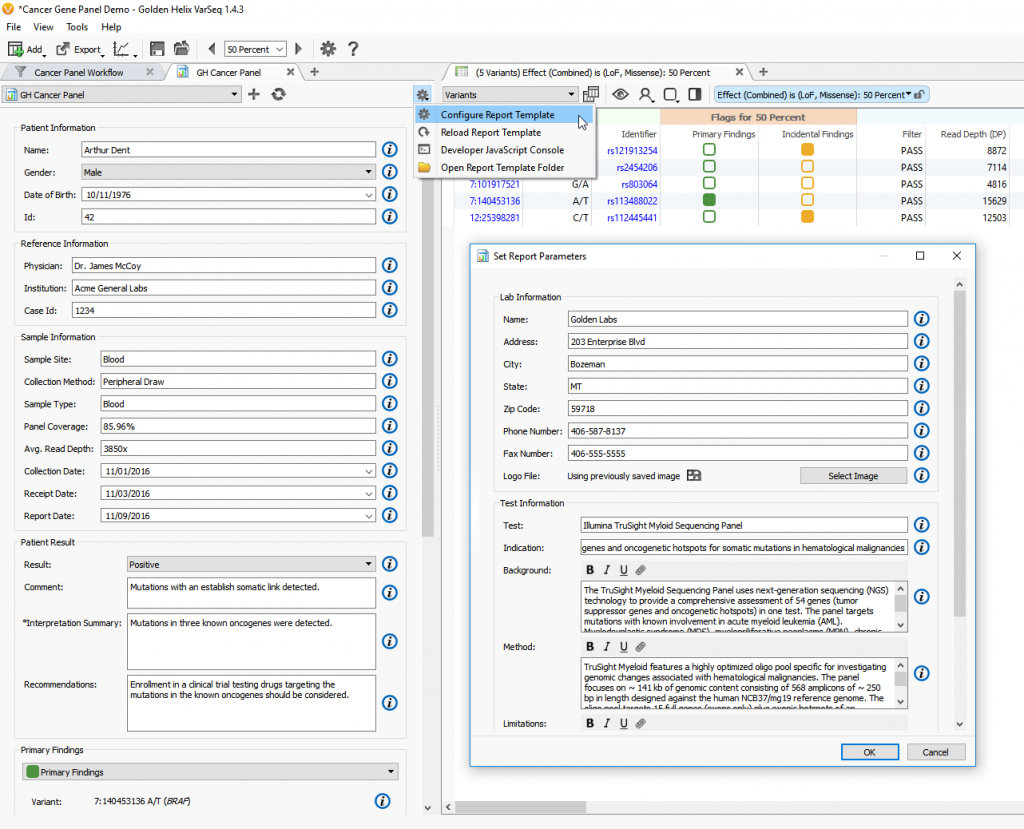
Figure 4. Configuring a Report Template.
After closing the template configuration dialog, return to the Report Template View. Edit the fields as necessary to customize the report for the current sample. Now that your report is configured to your liking, you can fill out the appropriate background information and include variants into your report.
By default, the “Name” field under “Patient Information” is automatically filled in using the name of the sample you have imported into VarSeq (Figure 5). However, this can be modified in the Report Template. Additional fields such as Physician, Sample Site and Case ID for example, can all be automatically filled in the report template if the sample information was imported from a text file during the data import process.
In addition, given BAM files for the sample, this report template automatically calculates average read depth and panel coverage (Figure 5).
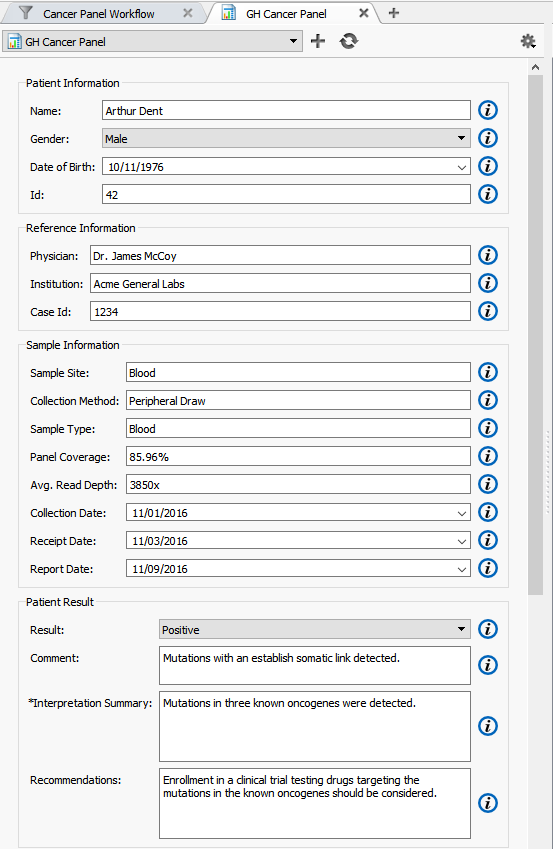
Figure 5. Report Template View.
The Primary and Incidental Findings Variant sections require that a Record Set be present in the project. In this example, I have selected the appropriate Record Set corresponding to their appropriate sections from the selection box. Automatically, the list of variants flagged in that Record Set will be added to the clinical report (Figure 6).
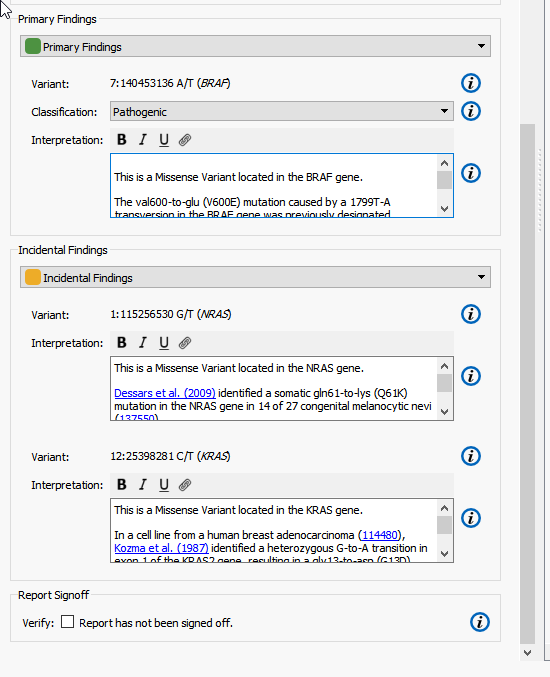
Figure 6. Adding Record Set to Report.
In the default template, variants have two user settable fields:
- Classification: This field is used to set the variant’s classification category. If an assessment database has been used as an annotation source, the classification will be set to the value used in the database. This value can always be reset by the user in the report tab.
- Interpretation: The interpretation section is used to describe the variant. The initial text is pulled from up to three sources – RefSeq Genes (sequence ontology), NHLBI ESP6500 (variant frequency) and OMIM (textual description). The links used in this section are used to generate the references found at the bottom of the report.
Now that you have entered in all the appropriate information in the report template, you can render the report as HTML documents by clicking the Sync icon in the toolbar. These HTML documents can be exported to a PDF by clicking on the Export icon. Export formats are completely customizable and can be tailored to integrate with other services that use formats like XML as their input.
In this report, the genes targeted by the cancer panel are displayed in different containers which are highlighted if a pathogenic variant has been detected. In this case, a pathogenic variant in the BRAF gene has been detected (Figure 7).
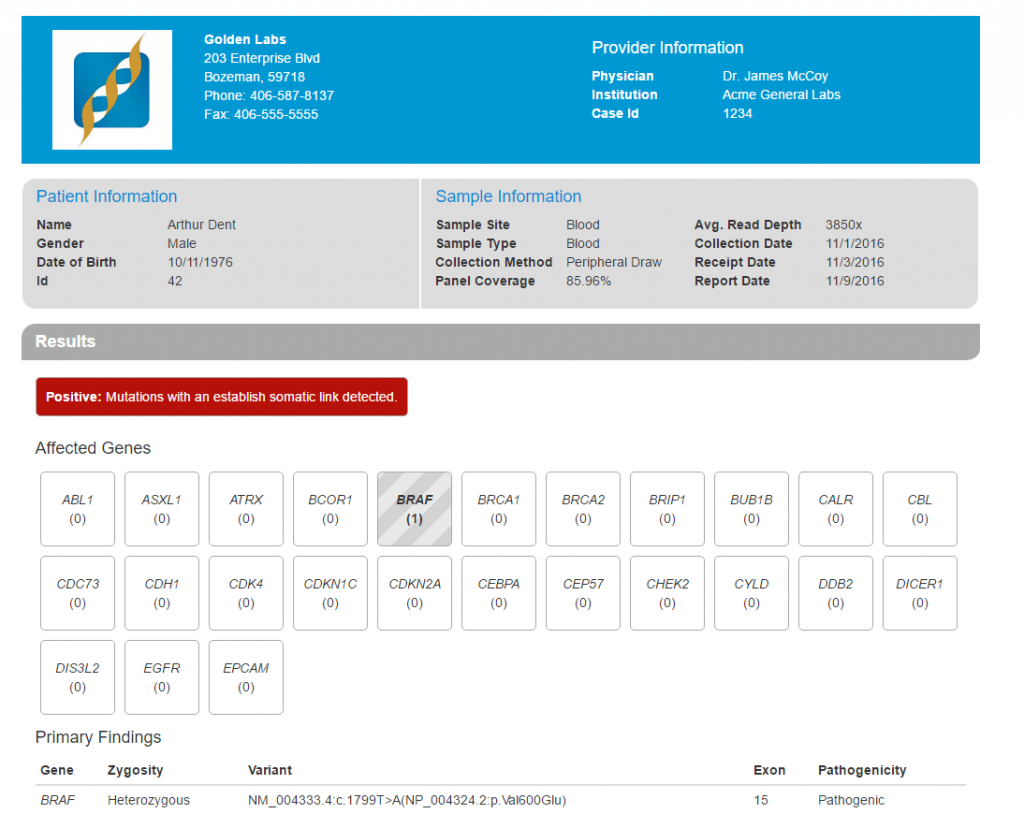
Figure 7. Clinical Report Rendered in HTML.
Clinical reports are fully customizable (if the information is in the VarSeq table view, it can be added to your report!). Users with JavaScript development experience can extensively modify templates.
The Hereditary Gene Panel Report Template automatically reports alternate allele frequency in the Interpretation section of report using the NHLBI ESP6500 catalog (Figure 8). In this example, I am going to modify the report template to instead report the alternate allele frequency from the ExAC Variant Frequency database.
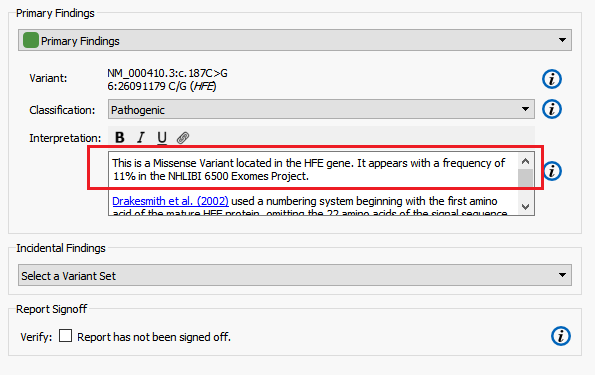
Figure 8. NHLBI Alternate Allele Frequency.
In the report template, click on the Gear menu > Open Report Template Folder.
Templates consist of three main parts:
- Layout Object: In the js file a variable layout is defined. This is a object which defines the form that is laid out in the report tab.
- Template: Each template contains a template file which defines the layout of the rendered report. Handlebars is used as the templating language.
- Render Function: The render function in js combines the information from the form and sources in VarSeq to create a context to pass to the compiled Handlebars template for rendering.
To change the variant allele frequency reported, open the report.js and the templateUtils file found in the Scripts folder in a text editor of your choosing. In line 292 of the report.js file, you can see the script which pulls the alternate allele frequency from the NHLBI ESP6500 catalog (Figure 9).

Figure 9. line 292 of Reports_JS file
To edit the script so it pulls in the alternate allele frequency reported in the ExAC Variant Frequency database, I need to examine the identifier that corresponds to that data in the project by opening the JavaScript Development Console in VarSeq. To access the development console, click the Gear menu and select Developer JavaScript Console. This will bring up a WebKit-like dev console.
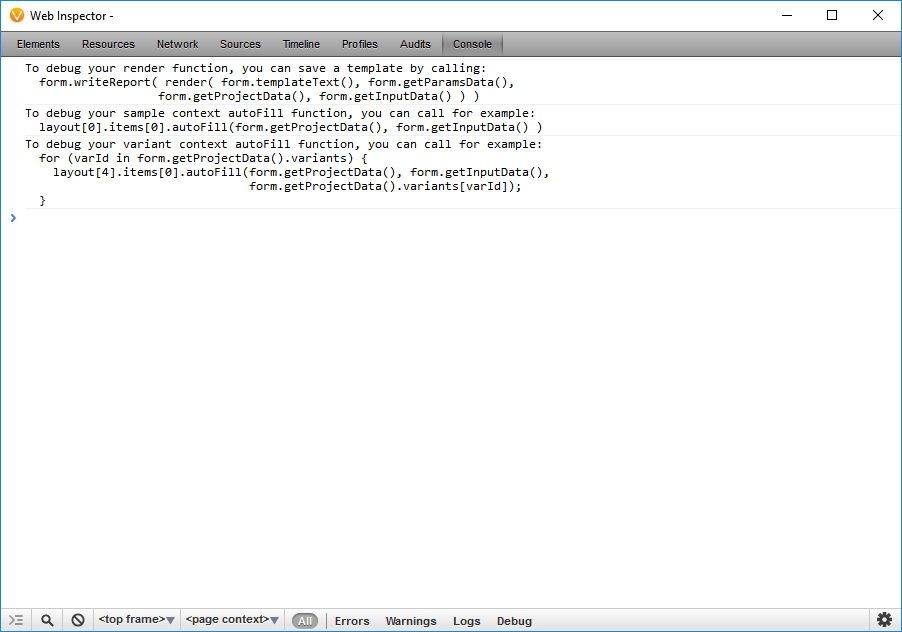
By entering in the JavaScript Console: form.getProjectData(). I can examine the identifiers that correspond to data in the project. The samples property contains the meta-data associated with the samples in the project. The sources property contains meta-data about the sources used during annotation. The variants property contains the annotated variants in the selected set of variants.
Here, I have browsed to the identifier that corresponds to the alternate allele frequency reported in the ExAC Variant Frequency database (ExAC-Variant Frequencies.AltAlleleFreqAF) (Figure 11).

Figure 11. The Variants Property Contains the Annotated Variants in the Selected set of Variants.
Now that I have the identifier that corresponds to the ExAC alternate allele frequency data in the project, I can edit the script on line 292 of the report.js file and insert “ExAC-Variant Frequencies.AltAlleleFreqAF” in place of “NHLBI.AllAAF” (Figure 12).

Figure 12. Editing line 292 of the report.js file and Inserting“ExAC-Variant Frequencies.AltAlleleFreqAF” in Place of “NHLBI.AllAAF.
Finally, I will want to modify the auto filed text so it references the ExAC Variant Frequency database instead of the NHLBI ESP6500 catalog in the clinical report.
In line 332 of the report.js file, change templateUtils.varFreqNHLBIString to templateUtils.varFreqExacString. This reference the auto filed text contained in line 299 of the templateUtils.js file (Figure 13).

Figure 13. Edit line 329 of report.js File to modify Auto-Filled Data.
Note that after making any changes to JavaScript files you will need to select Reload Report Template from the Gear menu to update the current namespace with those changes.
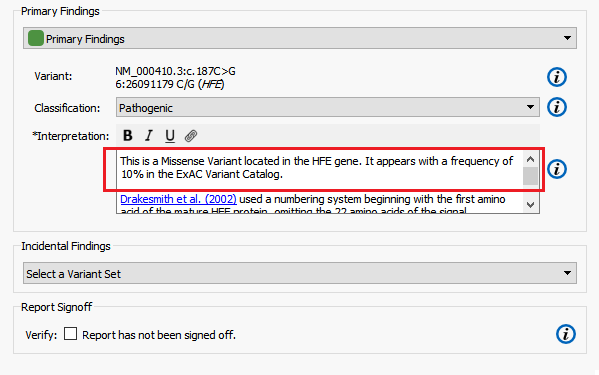
Figure 14. ExAC Alternate Allele Frequency.
VarSeq Reports comprehensive reporting platform accelerates the creation and delivery of actionable, data-driven patient information to referring providers so clinical labs can deliver on the promise of high quality, cost-effective patient care. Reports can be branded and styled to match the documents that your lab typically produces. With tight integration to your analysis results, you can also pull in additional annotation sources relevant to the sample being tested.
Remember, with some Javascript/HTML know-how, your report can be as customized as you want or need. If you don’t have the resources to help you customize your reports, Golden Helix is happy to offer customization services. For more information contact your account manager or email us at info@goldenhelix.com!